How to Do a Yarn Over

How to Do a Yarn Over: A Step-by-Step Guide for Crocheters

Written by: Jeff Tse

|

|

Time to read 6 min

Introduction

A yarn over is a fundamental technique in knitting that serves as a building block for many patterns, particularly in lace work. This simple yet versatile stitch creates an extra loop on your needle, resulting in a decorative hole, known as an eyelet, in your fabric. Understanding how to execute a yarn over correctly is essential for both beginners and experienced knitters, as it can significantly enhance the texture and visual appeal of your projects.

Whether you're looking to add delicate details to shawls, create airy patterns in sweaters, or simply increase the number of stitches in your work, mastering the yarn over will open up a world of creative possibilities. This guide will walk you through the step-by-step process of performing a yarn over, including variations for different techniques and common mistakes to avoid. With practice, you'll find that incorporating yarn overs into your knitting repertoire is not only easy but also incredibly rewarding. So grab your needles and yarn, and let’s dive into the art of the yarn over!

💡 Did you know

The history of the yarn over technique in knitting can be traced back to the development of knitting itself, which began around the 11th century in Egypt. Early knitted items included intricate patterns that utilized various techniques, including the yarn over, to create decorative holes known as eyelets. The first European examples of yarn overs appeared in the mid-16th century, particularly in luxurious silk stockings favored by nobility, such as those worn by Eleanora de Toledo.

As knitting evolved, so did the use of yarn overs, becoming a staple in lace knitting and textured patterns. The technique gained popularity during the Victorian era, where it was often featured in elaborate designs. Today, yarn overs remain a fundamental skill for knitters, used to create beautiful lacework and increases in a variety of projects. This essential technique not only enhances the aesthetic appeal of knitted items but also showcases the rich history and evolution of knitting as an art form.

What is a Yarn Over?

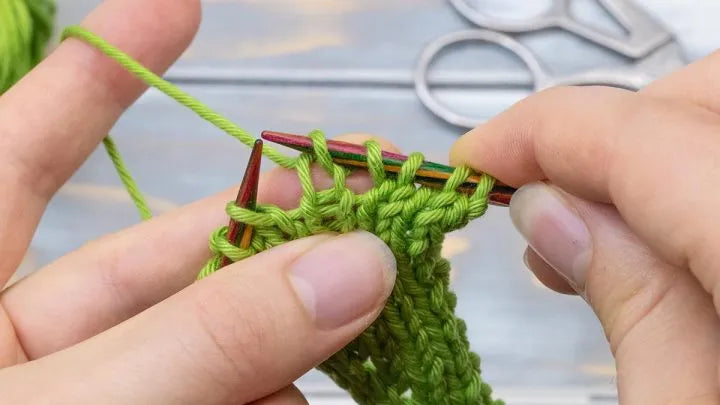
A yarn over (often abbreviated as "yo") is a technique used in knitting to create an extra stitch and a small hole, known as an eyelet, in your fabric. This technique is commonly used in lace knitting but can also be found in various other patterns. When executed correctly, yarn overs add texture and visual interest to your work.

Why Use Yarn Overs?

  • Increases: Yarn overs are one of the simplest methods to increase stitches in your knitting.
  • Eyelets: They create decorative holes that enhance the aesthetic appeal of knitted items.
  • Versatility: Yarn overs can be used in various patterns, including lace, textured stitches, and even buttonholes.

Basic Techniques on How to Do a Yarn Over

1. Yarn Over Between Knit Stitches

This is the most common way to perform a yarn over. Here’s how to do it:

Step-by-Step Instructions:

  1. Start with the Working Yarn: Ensure your working yarn is behind your needles as if you were about to knit.
  2. Bring the Yarn Forward: Move the working yarn forward between the two needles.
  3. Wrap the Yarn Over the Right Needle: Bring the yarn over the right needle from back to front (counterclockwise).
  4. Knit the Next Stitch: After completing the yarn over, knit the next stitch as usual.
  5. Result: You will see an extra loop on your right needle, which creates an eyelet when you look at your work.
How to Do a Yarn Over

2. Yarn Over Between Purl Stitches

Performing a yarn over between purl stitches follows a similar process but requires holding the yarn differently.

Step-by-Step Instructions:

  1. Position the Working Yarn: Hold the working yarn in front of your needles.
  2. Wrap the Yarn Over the Right Needle: Bring the working yarn over the right needle from front to back (counterclockwise).
  3. Purl the Next Stitch: Purl the next stitch as you normally would.
  4. Result: An additional stitch will be created, visible as a hole in your fabric.

3. Double Yarn Over

In some patterns, you may need to create a double yarn over (abbreviated as "dyo"). This technique adds even more stitches and creates larger eyelets.

Step-by-Step Instructions:

  1. Yarn Positioning: Start with your working yarn behind your needles.
  2. First Wrap: Bring the yarn forward between the needles and wrap it over the right needle once (as you would for a standard yarn over).
  3. Second Wrap: Without knitting yet, wrap the yarn around the right needle again (for a total of two wraps).
  4. Knit or Purl Next Stitch: Proceed to knit or purl your next stitch as per your pattern instructions.
  5. Result: You will have two loops on your right needle, creating a larger hole when viewed from the front.

Common Mistakes

1. Forgetting to Knit or Purl After a Yarn Over: One common mistake is forgetting to knit or purl after performing a yarn over. This can lead to unexpected results in your fabric and may cause confusion later on.

2. Misplacing Your Yarn: Ensure that you are correctly positioning your working yarn before performing a yarn over; otherwise, it can lead to uneven tension or missed stitches.

3. Not Counting Stitches: When using yarn overs for increases, always keep track of your stitch count. It’s easy to lose track if you’re not careful, especially in complex patterns.

How to Do a Yarn Over

Tips for Success

  • Practice Makes Perfect: If you're new to yarn overs, practice with scrap yarn until you feel comfortable.
  • Use Stitch Markers: If you're working on complex patterns that involve multiple increases and decreases, consider using stitch markers to keep track of where you need to perform yarn overs.
  • Check Your Tension: Pay attention to how tightly or loosely you’re pulling on your working yarn during a yarn over; inconsistent tension can affect your finished project.
  • Refer to Patterns Carefully: Always read through patterns that include yarn overs carefully; some may specify whether they want you to perform them knitwise or purlwise.

Applications of Yarn Overs

1. Lace Knitting: Yarn overs are fundamental in lace knitting patterns, where they create intricate designs featuring open spaces and delicate motifs.

2. Textured Patterns: In addition to lace knitting, many textured patterns utilize yarn overs for added depth and visual interest.

3. Buttonholes: Yarn overs can also be used when creating buttonholes in garments such as cardigans or sweaters.

FAQs About Yarn Overs

1. How do you perform a yarn over?

  • To perform a yarn over, start with the working yarn behind your needles. Bring the yarn forward between the needles and wrap it over the right needle from back to front (or front to back for purl stitches). Then, continue with your next stitch as instructed in your pattern.

2. When should I use a yarn over?

  • Yarn overs are typically used when you need to increase the number of stitches on your needle or when a pattern calls for decorative holes, such as in lace designs or textured patterns.

3. Is there a difference between yarn over knitwise and purlwise?

  • Yes, the technique is slightly different depending on whether you're knitting or purling. For knitwise, the yarn goes over the right needle before knitting the next stitch. For purlwise, the yarn goes over the right needle before purling the next stitch.

4. What does a yarn over look like in my finished project?

  • A yarn over will appear as a small hole or eyelet between two stitches in your knitted fabric. This decorative feature adds texture and visual interest to your work.

5. Can I use a yarn over in any pattern?

  • While yarn overs are versatile, they are most commonly found in patterns specifically designed for lace or textured stitches. Always check your pattern instructions to see if and where to use them.

6. How do I fix mistakes with yarn overs?

  • If you accidentally drop a stitch or make an error with your yarn overs, you can usually fix it by carefully picking up the dropped stitch with your needle or ripping back (frogging) to the mistake and redoing it.

7. What if I accidentally drop my stitch during a yarn over?

  • If you drop a stitch during a yarn over, simply pick it up carefully with your needle and continue knitting; however, make sure not to pull too tightly on any surrounding stitches.

8. Where can I find tutorials for learning more about yarn overs?

  • There are many resources available online, including video tutorials on platforms like YouTube and knitting blogs that provide step-by-step instructions and tips for mastering yarn overs.

Learn More about Crochet

How to Do a Yarn Over